

This is featured post 1 title
Replace these every slider sentences with your featured post descriptions.Go to Blogger edit html and find these sentences.Now replace these with your own descriptions.This theme is Bloggerized by Lasantha - Premiumbloggertemplates.com.

This is featured post 2 title
Replace these every slider sentences with your featured post descriptions.Go to Blogger edit html and find these sentences.Now replace these with your own descriptions.This theme is Bloggerized by Lasantha - Premiumbloggertemplates.com.

This is featured post 3 title
Replace these every slider sentences with your featured post descriptions.Go to Blogger edit html and find these sentences.Now replace these with your own descriptions.This theme is Bloggerized by Lasantha - Premiumbloggertemplates.com.


Saturday, March 24, 2012
How to Create Bootable Windows 8 USB Drive from ISO Image
 10:49 PM
 Editor

 We saw yesterday how you can install and test the latest Windows 8 build on your system as a virtual operating system using Oracle VirtualBox.
For those who haven’t heard, the consumer preview of Windows 8 is now available for everyone to test. It’s like what Microsoft did during Windows 7 launch. They first released a preview build for free to get feedback from the users before shipping the final version of the product. And the big news that the Windows 8 consumer preview has already crossed 1 million downloads.
After few hours of testing I was convinced that the build is stable enough, and I can take it to next level by installing it parallel to Windows 7 via dual boot. If you too are looking forward to install Windows 8 on your computer, I would prefer you create a bootable USB drive instead of a bootable DVD.
Note:
This is a consumer preview of Windows 8 and not the final stable
version. So keep in mind that you are always on your own if you mess up
your computer while installing or using this Windows 8 build.
A
USB drive is always faster than DVDs and the chances of failed or
corrupt installation are very low as compared to optical media. So lets
see how you can create the bootable USB of Windows 8 in the easiest way possible.Necessary Prerequisites
- Download the ISO file of Windows 8 on your system.
- A minimum of 4 GB removable drive for 32-bit Windows and 8 GB for 64-bit Windows 8 operating system.
- Backup all the data (if any) from your removable drive. Better, backup important data on your PC too.
Creating the Windows 8 Bootable USB Drive
Step 1: Download and extract WinUSB Maker on your computer. WinUSB maker is a portable application and thus does not require installation of any kind. You only need to run the .exe file.Step 2: Run the WinUSB Maker tool with administrative privileges to start creating your bootable USB drive. (right-click on the file, and click Run as Administrator)
Step 3: In the tool, select the option ISO image bootable disk under the Functions section. Select Normal Detection Mode and browse for the Windows 8 bootable ISO (Image file) you have already downloaded on your system.

Step 4: Finally, select the USB drive and drive MBR system (if you have a single one plugged in, it will be selected by default, if you have more than one, click on the dropdown menu and make a selection from the list) and click on the button Make it Bootable .

That’s all, the tool will now format the USB drive and copy all the Windows installation files to it and make it bootable.

You can now plug in the device into your system and select removable drive as your first boot selection preference in your BIOS and install Windows 8.
My Verdict
Although there’s an official Microsoft tool to create bootable USB drive from an ISO image, WinUSB maker’s portable nature and ease of use drew my attention. Furthermore, WinUSB gives a bit of an extra control to the user than the official tool for the same.Friday, March 9, 2012
How to Download and Install Windows 8 on a New Partition
You want to try out Windows 8. Excellent! But you're not foolhardy
enough to try using a developer preview build as your main work/play
operating system--you just want to dabble. We'll show you how to
download and install the Windows 8 developer's preview onto a separate
partition (or separate hard drive, if you have a spare). If you don't
feel like mucking your hard drive with another partition, read How to Download and Install Windows 8 to a Virtual Machine for a less-intrusive way to get Windows 8 up and running on your PC.
If you have a spare hard drive lying around, this process is pretty easy: Download the appropriate Windows 8 ISO from the Microsoft Developer Network site, burn it to a DVD, turn off your PC, slap the hard drive in your case, and connect it up to your motherboard. Then just turn your system on and either press the key that allows you to access your motherboard's boot menu or change the boot options in the BIOS so your optical drive is recognized before your main hard drive; you should then be booting off your new Windows 8 disk. From there, just fire up the Windows 8 installer and install the operating system to your new drive.
However, if you only have one hard drive in your system, you'll have to be a little bit more creative in order to install Windows 8 without nuking your existing Windows installation. Welcome to the world of drive partitioning: In layman's terms, partitioning takes a hard drive's total storage and splits it into separate chunks of data. Your operating system then treats these separate data partitions as separate storage volumes.
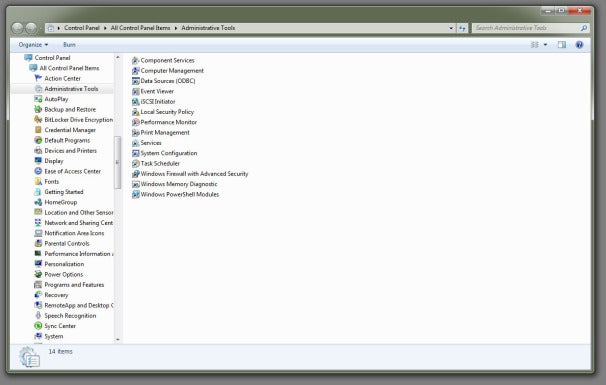
Assuming you're currently running Windows Vista or Windows 7, open Control Panel and open up the Administrative Tools screen. There, double-click on the Computer Management option. When that window appears, look for the "Disk Management" submenu under "Storage" on the left-hand sidebar. Click that.
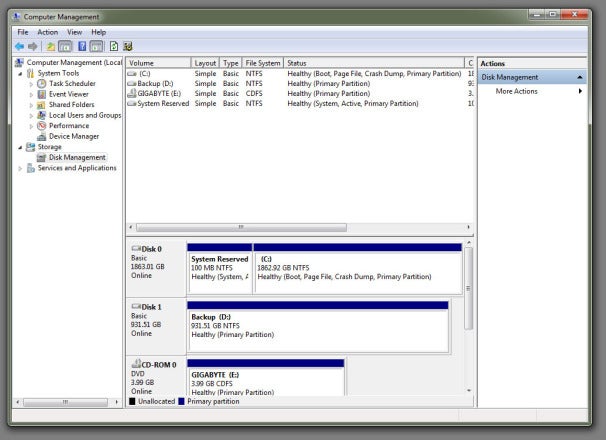
You'll see your hard drive (and optical drive) on the screen: Your primary drive should already be split into a "System Reserved" volume and your primary C:\ volume.
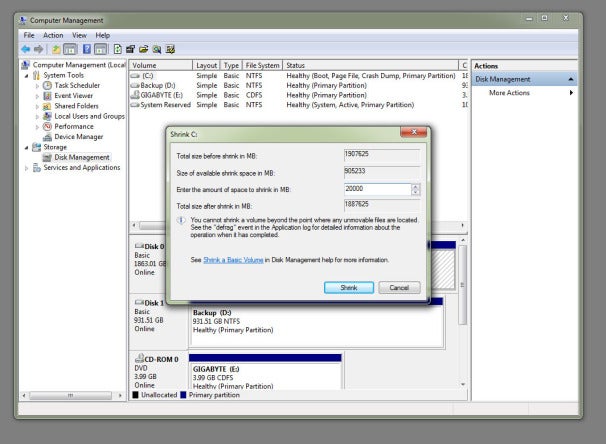
Right-click on the C:\ volume and select the "Shrink Volume" option, and then reduce the size of your volume by at least 16 gigabytes for a 32-bit installation of Windows 8 or 20 gigabytes for a 64-bit installation.
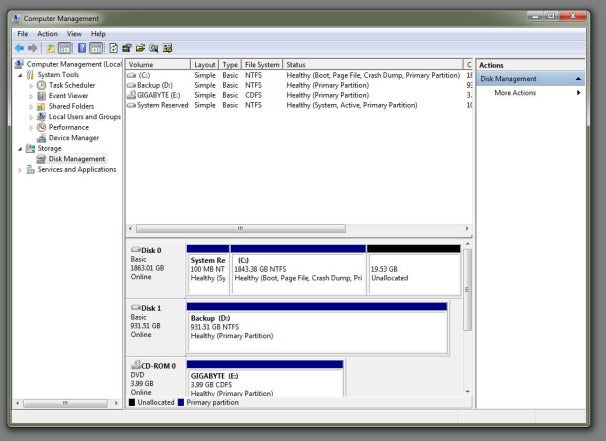
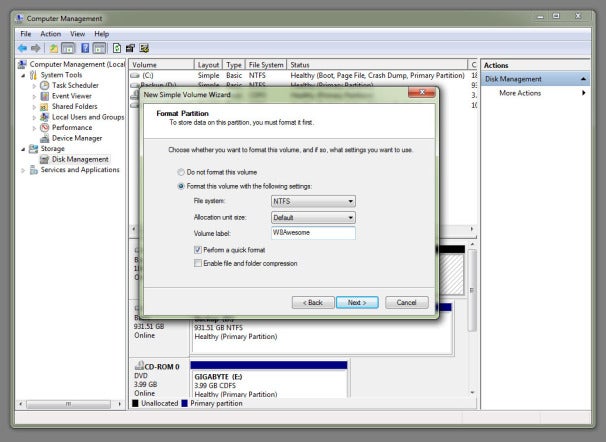
You'll now see a new, monochromatic, "unallocated" hunk of storage appear next to your C:\ volume in the graphical display. Right-click on it, select the New Simple Volume option, and click on the Next button until you reach the screen for assigning letters and drive paths.
Feel free to assign your new volume whatever drive letter you most prefer. Click Next one more time and give your volume a witty name; now click Next (and then Finish) to quick-format the volume as an NTFS partition.
Next, burn the Windows 8 image to a disc using a freeware app like Imgburn or CDBurnerXP, then reboot your PC, access your BIOS setup menu (typically by pressing Delete or another specified key while booting up), and change the boot order so your PC will boot from your optical drive instead of your primary hard drive when you restart your computer. Once your PC boots from the Windows 8 DVD, just install Windows 8 to your new partition (identifiable by the drive letter and name you picked out).
And here's an extra tip: Once you've loaded up Windows 8 for the first time, you'll be able to edit Windows' boot settings to make Windows 7 boot by default instead of 8 (which happens after a short time delay if you don't select an operating system yourself).
If you have a spare hard drive lying around, this process is pretty easy: Download the appropriate Windows 8 ISO from the Microsoft Developer Network site, burn it to a DVD, turn off your PC, slap the hard drive in your case, and connect it up to your motherboard. Then just turn your system on and either press the key that allows you to access your motherboard's boot menu or change the boot options in the BIOS so your optical drive is recognized before your main hard drive; you should then be booting off your new Windows 8 disk. From there, just fire up the Windows 8 installer and install the operating system to your new drive.
However, if you only have one hard drive in your system, you'll have to be a little bit more creative in order to install Windows 8 without nuking your existing Windows installation. Welcome to the world of drive partitioning: In layman's terms, partitioning takes a hard drive's total storage and splits it into separate chunks of data. Your operating system then treats these separate data partitions as separate storage volumes.
Assuming you're currently running Windows Vista or Windows 7, open Control Panel and open up the Administrative Tools screen. There, double-click on the Computer Management option. When that window appears, look for the "Disk Management" submenu under "Storage" on the left-hand sidebar. Click that.
You'll see your hard drive (and optical drive) on the screen: Your primary drive should already be split into a "System Reserved" volume and your primary C:\ volume.
Right-click on the C:\ volume and select the "Shrink Volume" option, and then reduce the size of your volume by at least 16 gigabytes for a 32-bit installation of Windows 8 or 20 gigabytes for a 64-bit installation.
You'll now see a new, monochromatic, "unallocated" hunk of storage appear next to your C:\ volume in the graphical display. Right-click on it, select the New Simple Volume option, and click on the Next button until you reach the screen for assigning letters and drive paths.
Feel free to assign your new volume whatever drive letter you most prefer. Click Next one more time and give your volume a witty name; now click Next (and then Finish) to quick-format the volume as an NTFS partition.
Next, burn the Windows 8 image to a disc using a freeware app like Imgburn or CDBurnerXP, then reboot your PC, access your BIOS setup menu (typically by pressing Delete or another specified key while booting up), and change the boot order so your PC will boot from your optical drive instead of your primary hard drive when you restart your computer. Once your PC boots from the Windows 8 DVD, just install Windows 8 to your new partition (identifiable by the drive letter and name you picked out).
And here's an extra tip: Once you've loaded up Windows 8 for the first time, you'll be able to edit Windows' boot settings to make Windows 7 boot by default instead of 8 (which happens after a short time delay if you don't select an operating system yourself).


